In this tutorial, we’ll show you a step-by-step process on howtolockformulas in your Excel sheet while still allowing data entry. This helps you protect the integrity of your Excel file and allow collaboration for efficient work. 🙌
By default, when you protect your worksheet, Excellocks all the cells in your sheet and not just the ones containing formulas. To get around that, you'll have to first unlock all your cells, select the cells containing formulas, and then lock these cells with formulas.
In this section, we’ll provide a step-by-step guide on how to lock formulas using the dollar sign to create absolute references. This method is vital for maintaining consistent references in your calculations.
To lock a single cell containing a formula, select the cell and press F4 to add a $ symbol to the formula. This will lock the cell reference in the formula. To lock multiple cells with formulas, highlight the cells and press F4 to add the $ symbol to each formula. This will lock all cell references in the highlighted cells.
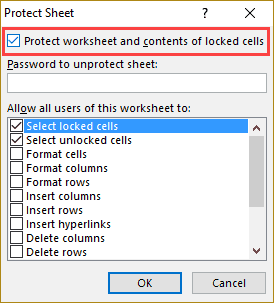
Unlock all the cells in the sheet. Select only the cells with formulas you want to lock. Lock the selected cells. Use the Protect Sheet command to protect the locked cells. These steps will allow your users to view and edit all the cells except those with formulas.
To safeguard your work, it's important to lock and protect cells containing formulas so that others can view the results but cannot modify the formulas themselves. Excel provides several methods to achieve this, including built-in features as well as enhanced options provided by add-ins like Kutools for Excel.
To make formulas less visible, set the formula cells to hidden in the Protection tab, then protect the sheet. To prevent users from copying formulas as text, consider additional measures like hiding formulas or using VBA. This approach involves hiding formulas within cells and controlling how users interact with the data through Data Validation.
 In this tutorial, you will learn how to lock formulas in Excel. This is a great way to make sure no one accidently changes/deletes your formulas.